Your 2025 Guide: What to Bring to an Amusement Park

Heading to an amusement park promises a day of thrills, laughter, and unforgettable memories. But a fantastic day can quickly turn frustrating with sunburn, a dead phone, or sore feet. The secret to a perfect visit isn't just picking the right rides; it's packing the right gear. This guide dives deep into exactly what to bring to an amusement park, moving beyond the obvious to give you practical, actionable advice.
We'll cover everything from must-have essentials to clever money-saving tricks, ensuring you're prepared for long lines, changing weather, and everything in between. Whether you're a family on a big vacation, a solo adventurer, or a van-lifer exploring parks across the country, this checklist is designed to help you pack smarter, stay comfortable, and focus on the fun.
Smart preparation is key for any successful outing, regardless of the destination. Beyond the thrill of a theme park, thoughtful planning is essential for any excursion; for instance, consider this guide on what to bring to a baby picnic to ensure a smooth and enjoyable experience for little ones. By thinking ahead, you can avoid common pitfalls and make the most of your day. This list will equip you with the knowledge to conquer your park day with confidence.
1. Portable Phone Charger / Power Bank
A portable phone charger, also known as a power bank, is a rechargeable battery pack that provides on-the-go power for your mobile devices. In an amusement park setting, your smartphone transforms into a multi-tool for digital tickets, park maps, mobile ordering, and capturing memories, all of which drain the battery rapidly. A reliable power bank ensures your lifeline stays charged from the opening ceremony to the final fireworks show.

This simple device prevents the stress of a dead phone when you're trying to locate your family, access your ride photos, or check wait times. Forgetting one is a common mistake that can disrupt an otherwise perfect day. Bringing your own is a key strategy when considering what to bring to an amusement park to avoid paying high prices for the park's own rental charging systems like FuelRod.
Actionable Tips for Using a Power Bank
- Choose the Right Capacity: For a full day at a large park like Universal Studios or Cedar Point, opt for a power bank with at least 20,000mAh capacity. This ensures enough power to charge multiple phones or one phone several times over. A popular, reliable option is the Anker PowerCore series.
- Charge Before You Go: Make it a habit to fully charge your power bank the night before your park visit.
- Bring the Correct Cable: Double-check that you've packed the appropriate charging cable (Lightning, USB-C, etc.) for each device you plan to charge.
- Conserve Your Phone's Battery: Use your phone’s low power mode. In areas with poor reception, switching to airplane mode can drastically slow battery drain while you're on rides or indoors.
2. Sunscreen (SPF 30+)
Sunscreen is a UV-protective lotion, spray, or stick applied to exposed skin to prevent painful sunburn and long-term skin damage. At an amusement park, you spend the majority of your day outdoors, waiting in queues and walking between attractions with minimal shade. This prolonged exposure to direct sun makes sunscreen one of the most critical health and comfort items when deciding what to bring to an amusement park.
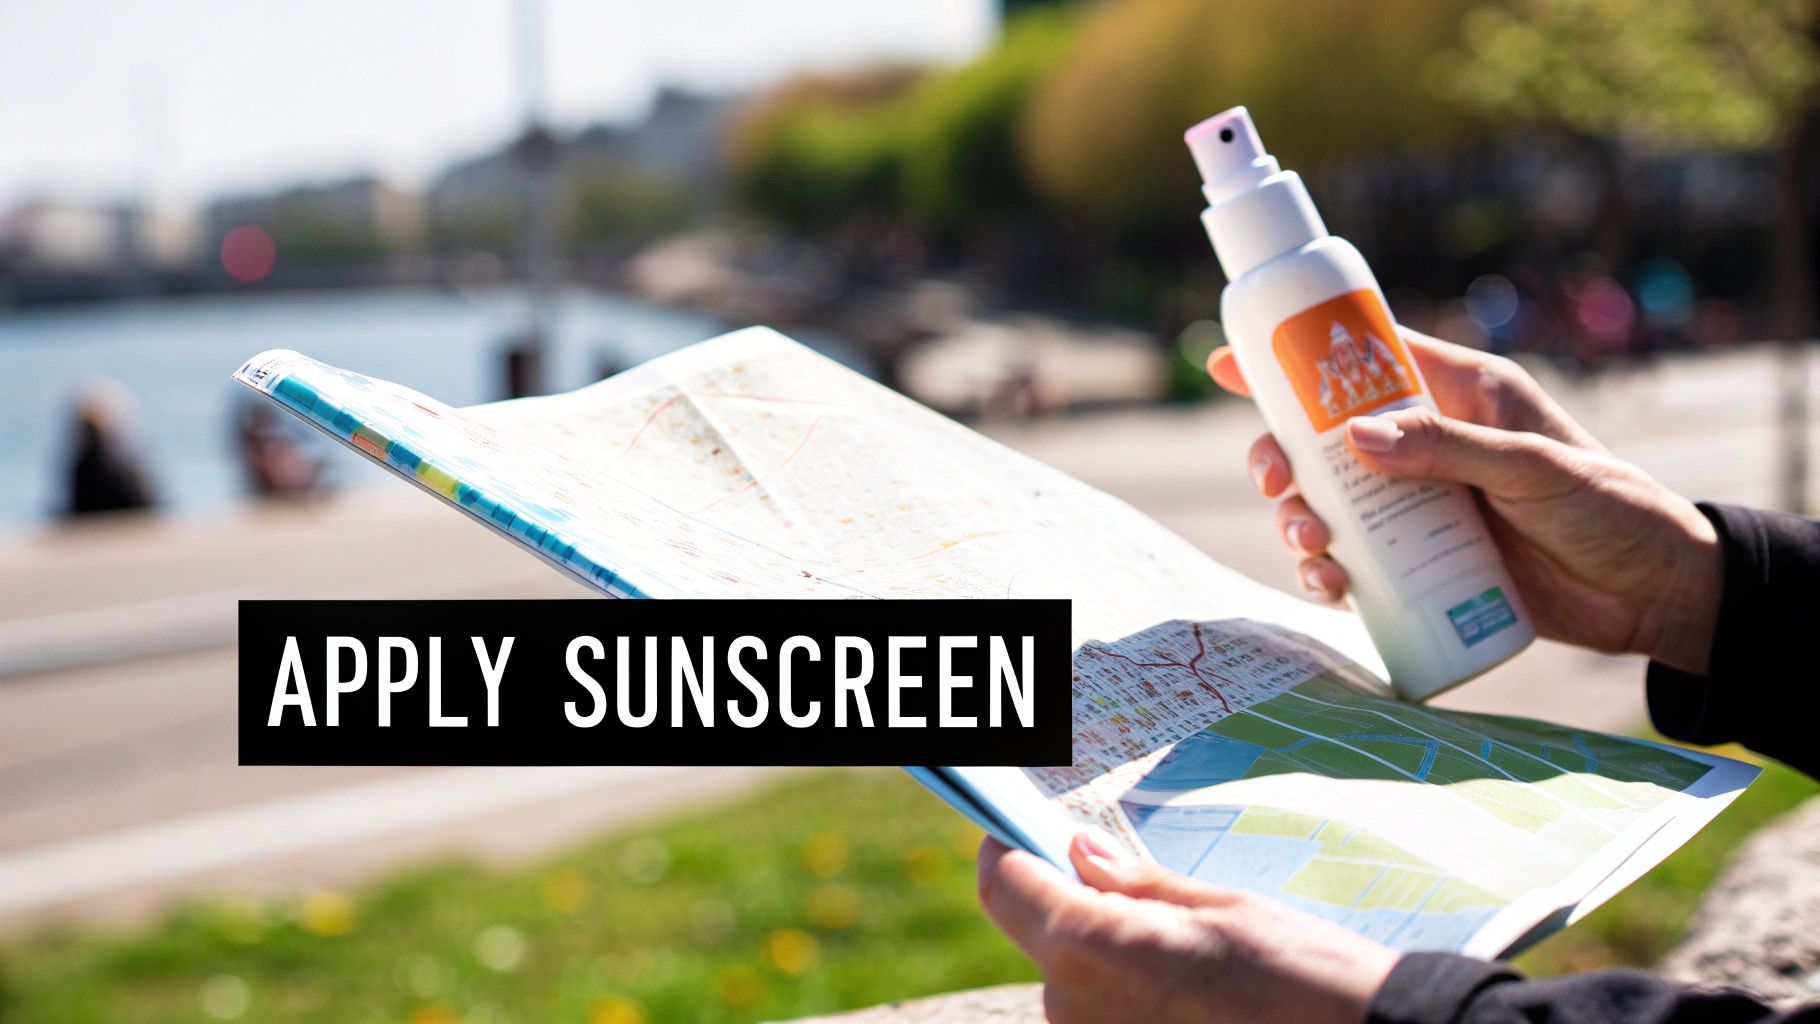
Failing to apply and reapply sunscreen can quickly lead to a painful burn that ruins the rest of your trip; research suggests that nearly 40% of park visitors experience sunburn during a single-day visit. Packing a reliable, broad-spectrum sunscreen with an SPF of 30 or higher is a non-negotiable step to protect yourself and your family. Popular options include Supergoop! PLAY for its lightweight feel or Neutrogena Ultra Sheer Dry-Touch for a budget-friendly choice.
Actionable Tips for Sunscreen Use
- Apply Early and Often: For maximum effectiveness, apply sunscreen about 15-30 minutes before you head out into the sun. Reapply it at least every two hours, or more frequently if you've been swimming, on a water ride, or sweating heavily.
- Use the Right Amount: Most people apply far too little sunscreen. A general rule is to use approximately one ounce (a full shot glass) to cover your entire body. For example, if you're using a spray, spray generously until you see an even sheen on the skin, then rub it in.
- Don't Forget Key Spots: Pay special attention to often-missed areas that burn easily. This includes the tops of your ears, the part in your hair, the back of your neck, and the tops of your feet if you're wearing sandals.
- Choose a Water-Resistant Formula: Even if you don't plan on visiting the water park, a water-resistant sunscreen will hold up better against sweat on a hot day. For water parks, consider a reef-safe formula to protect aquatic life.
3. Comfortable, Broken-In Walking Shoes
Supportive and well-worn walking shoes are your most critical piece of gear for an amusement park adventure. A typical park day involves walking anywhere from five to fifteen miles, often on unforgiving concrete. The right footwear is the difference between enjoying every moment and being sidelined by painful blisters, aching arches, and leg fatigue long before the park closes.
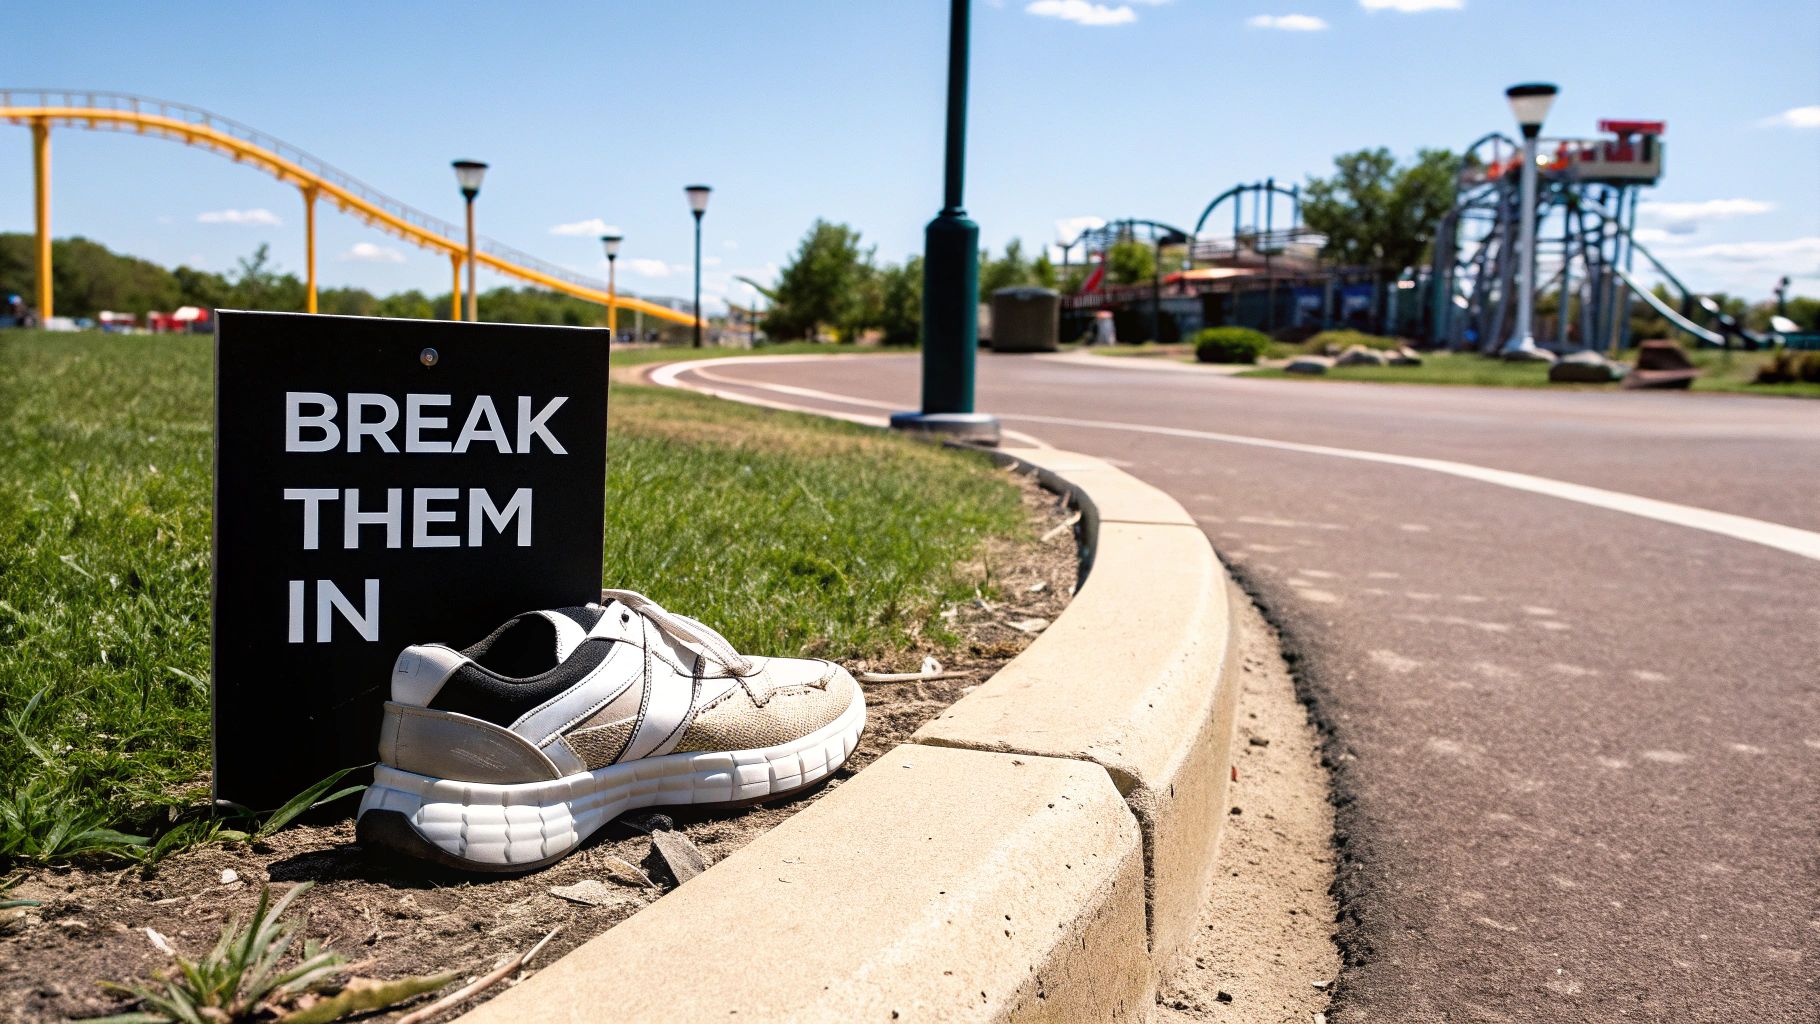
Choosing shoes you’ve already broken in is a non-negotiable part of your park strategy. Never wear brand-new shoes, no matter how comfortable they seem in the store. Prioritizing proven footwear is a foundational element in any effective theme park packing list. This simple decision prevents a common mistake that can easily ruin an expensive and highly anticipated trip.
Actionable Tips for Footwear
- Break Them In Thoroughly: Wear any new shoes for at least 5-7 extended periods before your park visit. A practical test is to wear them for a 3-4 hour walk at a local mall or park. If they cause any discomfort, don't bring them.
- Choose Proven Brands: Look for shoes known for all-day comfort. Brands like Hoka or On Running are incredibly popular for their cushioning, while classics like New Balance Fresh Foam or Skechers Go Walk lines are trusted by seasoned park-goers.
- Pack Blister Prevention: Bring a small kit with moleskin padding or blister-specific bandages like Compeed. Apply them to potential hot spots before a blister forms, such as the back of your heel or sides of your toes.
- Wear Moisture-Wicking Socks: Select athletic socks made from synthetic materials or merino wool, not cotton. They pull sweat away from your skin, which is the leading cause of friction and blisters.
- Avoid Open-Toed Shoes: Despite the temptation in hot weather, flip-flops and unsupportive sandals often lead to foot pain and are less safe on many attractions.
4. Reusable Water Bottle (Empty, To Fill Later)
A reusable water bottle is a durable, lightweight container you bring empty to fill up inside the park. Staying hydrated is non-negotiable when spending a day walking, standing in the sun, and enjoying thrilling rides. A reusable bottle eliminates the high cost of single-use plastic bottles sold at park concessions, easily saving a family between $50 and $150 in a single day.
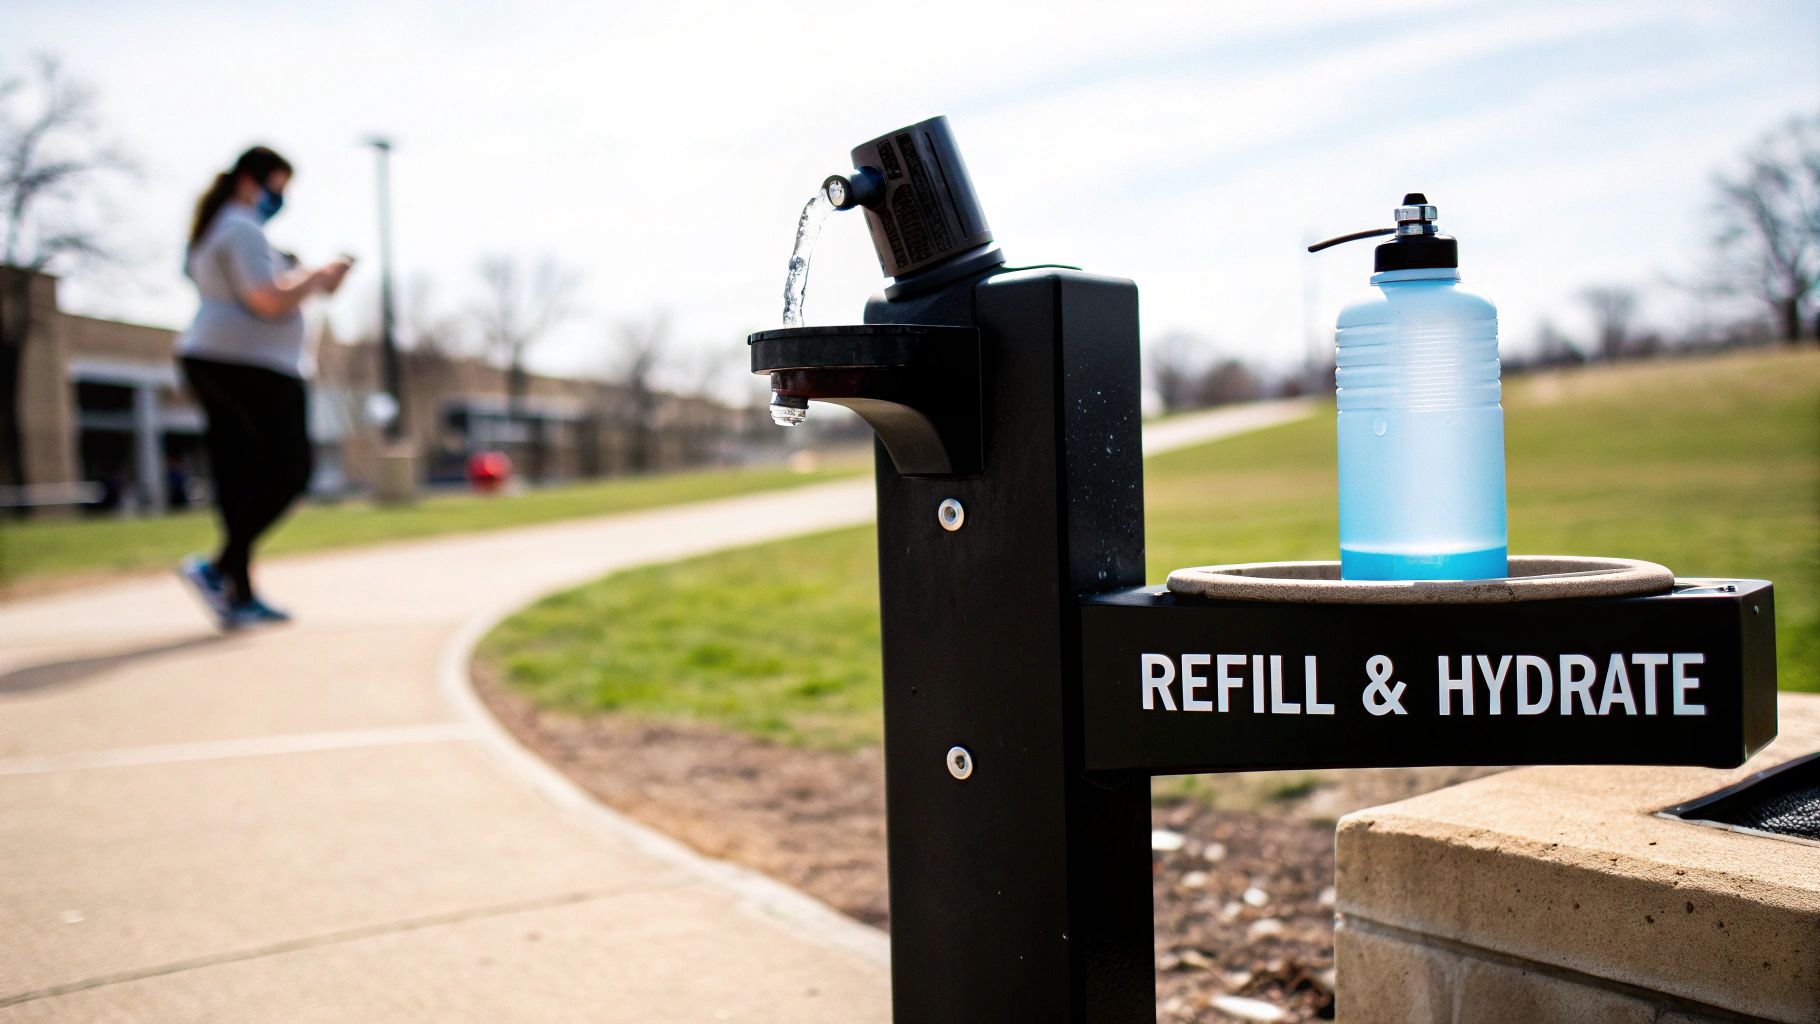
This simple item is one of the most effective money-saving hacks for what to bring to an amusement park. Most major parks, including Disney, Universal, and Six Flags, have water fountains and bottle refill stations readily available. Forgoing a reusable bottle is a common mistake that leads to unnecessary spending and contributes to plastic waste, making it a smart choice for both your wallet and the environment.
Actionable Tips for Using a Reusable Water Bottle
- Bring It Empty: Ensure your bottle is completely empty before you reach the security checkpoint to comply with park rules. You can fill it at the first water fountain you see after entering.
- Ask for Free Ice Water: Most quick-service restaurants and food stands will provide a cup of ice water for free, even if you aren't making a purchase. Use this to fill your bottle with cold, refreshing water.
- Choose the Right Type: An insulated bottle will keep your water cold for hours on a hot day. For maximum space-saving, a collapsible water bottle like the HYDAWAY is a perfect solution. It stays full-sized when you need it for hydration, then squishes down to fit in a pocket or small bag when empty, freeing up space for souvenirs later in the day.
- Hydrate Proactively: Don't wait until you feel thirsty to drink. Set a reminder on your phone or smartwatch to take sips of water consistently throughout the day, especially during the hottest hours between 11 a.m. and 4 p.m.
5. Portable Shade (Hat, Cap, or Visor)
Portable shade, in the form of a hat, cap, or visor, is a wearable barrier that provides crucial sun protection and helps regulate your body temperature. Spending hours under the direct sun while waiting in lines or walking between attractions can quickly lead to sunburn and heat exhaustion. A good hat shields your face, scalp, and neck from harmful UV rays, making your day significantly more comfortable and safe.
This simple accessory prevents the discomfort of squinting into the sun all day and reduces the risk of sun-related fatigue. Forgetting one is a common oversight that can lead to buying an overpriced souvenir hat out of necessity. Including a hat in your bag is a smart move when deciding what to bring to an amusement park to stay cool and protected from gate opening to the last ride.
Actionable Tips for Choosing and Using a Hat
- Prioritize Coverage and Color: Choose a hat with a brim of at least 3 inches for adequate face and neck coverage. Light-colored fabrics like white or beige are best as they reflect sunlight and absorb less heat. A packable sun hat is a great choice as it can be folded into your bag without losing its shape.
- Secure Your Hat: For thrill rides, a hat with a chin strap is ideal. If yours doesn't have one, plan to stow it in a zippered pocket or use a clip to attach it to your bag so it doesn’t fly off on the first big drop of a rollercoaster.
- Know the Rules: Be prepared to remove your hat on certain high-speed rides. Always follow the instructions provided by park staff for your safety.
- Consider a Visor: If you find full hats too warm, a visor is a great alternative that protects your face while allowing for maximum airflow. For those who prefer open-top options, guides on selecting a high-performance visor can highlight features like effective sweatbands and lightweight designs.
6. Small Backpack or Day Bag (15-25L capacity)
A small, lightweight backpack is your mobile base camp for a day at an amusement park. This essential carrier holds everything from sunscreen and snacks to your power bank and a HYDAWAY collapsible bottle, keeping your hands free for rides, photos, and high-fives with park characters. Choosing the right bag ensures you can carry all your necessities without being weighed down or violating park entry rules.
A well-chosen day bag is a game-changer for park logistics. It prevents the need to constantly return to a locker and keeps valuable items secure. Forgetting one often leads to juggling items, overstuffed pockets, or paying inflated prices for a flimsy park-branded bag. Having the right backpack is a crucial part of planning what to bring to an amusement park for a comfortable and organized day.
Actionable Tips for Choosing a Day Bag
- Stick to the Right Size: Aim for a capacity between 15 and 25 liters. This size is large enough for essentials but small enough to fit into most standard ride lockers and comply with park security policies. For example, bags from brands like Osprey or North Face in this size range are popular choices.
- Prioritize Comfort: Look for padded shoulder straps to prevent digging and a breathable back panel to minimize sweat on hot days. A bag with a sternum or hip belt can help distribute weight for even greater comfort.
- Opt for Water Resistance: A bag made from water-resistant or waterproof material is a smart choice to protect your electronics and other belongings from sudden downpours or splash zones on water rides.
- Utilize Organization: Choose a backpack with multiple compartments and pockets. This helps you quickly find what you need without unpacking everything and keeps food items separate from electronics. A side water bottle pocket is perfect for stashing your reusable bottle.
7. Portable Phone Mount/Holder
A portable phone mount or holder is a hands-free device designed to securely attach your smartphone to your backpack strap, an armband, or your body. At an amusement park, this tool liberates your hands for holding snacks, drinks, or the hands of little ones, all while keeping your phone accessible for navigation and capturing point-of-view (POV) videos of your day. It transforms your phone into a wearable camera, reducing the strain of holding it for extended periods.
This simple accessory prevents the risk of dropping your phone while trying to film a parade or fumbling for it to catch a candid moment. Bringing a mount is a smart addition to your list of what to bring to an amusement park, ensuring you can document your memories without being glued to your screen. This is especially useful for solo travelers wanting to capture their experience or parents needing to keep their hands free.
Actionable Tips for Using a Phone Mount
- Choose the Right Mount: Consider a secure, clip-style mount like the Peak Design Mobile system for a backpack strap or a gimbal like the DJI Osmo Mobile for incredibly smooth video. For a simple solution, a lanyard with a secure case ensures your phone is always within reach and safe from drops.
- Secure Before High-G Rides: Before boarding a rollercoaster or any high-speed attraction, ensure your phone is securely stowed in a zippered pocket. Even the best mounts may not be designed for intense g-forces.
- Enable Camera Gridlines: Turn on your phone camera's gridlines to help you apply the rule of thirds and frame more compelling photos and videos of the park's architecture and shows.
- Back Up Your Memories: Connect to the park's Wi-Fi during a lunch break or at the end of the day to back up your photos and videos to a cloud service. This protects your memories in case of phone loss or damage.
8. Portable Snacks (Non-Perishable)
Portable, non-perishable snacks are calorie-dense, shelf-stable foods brought from home to supplement park meals and maintain energy levels throughout the day. With park concessions being notoriously expensive, strategic snacking is essential for avoiding energy crashes, managing a budget, and keeping everyone in your group happy between meals. This is a crucial item on any list of what to bring to an amusement park.
Bringing your own snacks prevents the need to stand in long lines for a simple bag of chips or a pretzel, saving you valuable time that could be spent on rides. It also allows you to control the nutritional content, ensuring you have healthy, energy-boosting options available when you need them most. Storing them in a lightweight container helps keep them from getting crushed in your bag.
Actionable Tips for Packing Snacks
- Choose Calorie-Dense Options: To maximize energy while minimizing weight and space, pack items like granola bars, protein bars, trail mix, nuts, and dried fruit. Think about packing items you'd take on a hike for sustained energy.
- Pack for Electrolyte Replacement: On hot days, you'll lose salt through sweat. Include salty snacks like pretzels, crackers, or jerky to help replenish lost electrolytes and prevent fatigue.
- Use Smart Storage: Pack snacks in a separate, easy-to-access compartment of your bag. A HYDAWAY collapsible food container is an ideal choice; it protects delicate snacks like crackers from getting crushed and then collapses to a thin profile once empty, saving significant space in your pack for the rest of the day. Using a collapsible silicone food container is a clever way to stay organized without the bulk.
- Bring More Than You Need: It’s always better to have a few leftover snacks at the end of the day than to run out when hunger strikes unexpectedly.
- Pack a Small Trash Bag: Be a responsible guest by packing a small bag to collect your wrappers and food waste, ensuring you leave no trace behind.
9. Motion Sickness Prevention (Ginger, Dramamine, Sea-Bands)
Motion sickness prevention includes over-the-counter medications, natural remedies, and acupressure bands designed to combat nausea and dizziness caused by spinning rides and simulators. An amusement park is full of triggers for motion sickness, and nothing ruins the fun faster than feeling unwell. Being proactive with a preventative solution ensures you can enjoy every loop, drop, and spin without regret.
This simple preparation can be the difference between fully experiencing thrilling attractions and spending half the day on a park bench. Forgetting this item is a common oversight that can sideline you from making memories with your group. Packing your preferred remedy is a crucial step when planning what to bring to an amusement park, as it allows you to participate in everything the park has to offer comfortably.
Actionable Tips for Preventing Motion Sickness
- Take Medication Early: For medications like Dramamine, take the recommended dose 30 to 60 minutes before you board your first intense ride to allow it to take effect.
- Opt for Less Drowsy Formulas: Choose a non-drowsy or less-drowsy formula to stay alert and energetic throughout the day. Many people find Bonine to be effective with fewer drowsy side effects.
- Consider Natural Alternatives: If you prefer to avoid medication, try ginger candies or pack a small bottle of ginger ale. For a non-ingestible option, Sea-Bands apply pressure to a specific point on the wrist known to alleviate nausea.
- Stay Hydrated and Mindful: Dehydration can worsen nausea. Sip water regularly from a reusable bottle between rides. Also, try focusing on a fixed point on the horizon during rides and choose middle seats, which often experience less intense movement.
10. Portable Blister/First Aid Kit
A portable blister and first aid kit is a compact, personalized collection of medical supplies to handle common amusement park ailments. With miles of walking, new shoes, and constant activity, minor issues like blisters, scrapes, and headaches are almost inevitable. Having a small kit on hand means you can address these problems immediately, preventing a small annoyance from turning into a day-ruining injury.
While parks have first aid stations, they can be far away when you need them most. Carrying your own supplies is a crucial part of planning what to bring to an amusement park, saving you a long, painful walk to find a single bandage. You can buy pre-made kits from brands like Welly or assemble a DIY version in a small zip-top bag for ultimate customization.
Actionable Tips for Your First Aid Kit
- Prioritize Foot Care: Blisters are the top fun-killer. Pack moleskin, hydrocolloid blister bandages, and antiseptic wipes. At the first sign of a "hot spot" on your foot, stop and apply protection before a blister forms.
- Include Pain & Allergy Relief: Pack single-dose packets of your preferred pain reliever (like ibuprofen or acetaminophen) for headaches and muscle soreness. If you or your family members have allergies, include antihistamines.
- Customize for Your Crew: Add any personal medications your group might need, such as an EpiPen or children's pain reliever. A few stomach-settling tablets can also be a lifesaver after one too many park snacks.
- Keep it Accessible: Store your kit in an outer pocket of your backpack or bag so you can grab it quickly without unpacking everything. For example, place it in the front zipper pouch of your backpack for immediate access.
Top 10 Amusement Park Essentials Comparison
| Item | 🔄 Implementation complexity | ⚡ Resource requirements | ⭐ Expected outcomes | 📊 Ideal use cases | 💡 Key advantages / tips |
|---|---|---|---|---|---|
| Portable Phone Charger / Power Bank | Low — simple prep (pre-charge) | Moderate — $15–50; moderate weight | High — ⭐⭐⭐⭐ reliable all-day power | All-day park visits, mobile ticketing, photo/video heavy days | Bring 20,000+mAh for full day; keep cables accessible |
| Sunscreen (SPF 30+) | Low — requires reapplication every ~2 hrs | Low — inexpensive if pre-bought; park markup possible | High — ⭐⭐⭐⭐ prevents sunburn and long-term damage | Sunny days, water parks, long queues | Apply 15 min before sun; reapply after swimming or 2 hrs |
| Comfortable, Broken-In Walking Shoes | Moderate — require selection and break-in | Moderate — cost varies; prior wear needed | Very high — ⭐⭐⭐⭐⭐ prevents pain, increases mobility | Extended walking/standing days, park hopping | Break in with 5–7 wears; use moisture-wicking socks |
| Reusable Water Bottle (Empty to Fill) | Low — bring empty and refill as needed | Low — one-time purchase; saves on drinks | High — ⭐⭐⭐⭐ maintains hydration and saves money | Hot days, long visits, families aiming to save | Bring empty through security; refill at water stations |
| Portable Shade (Hat, Cap, Visor) | Low — wear and adjust as needed | Low — inexpensive and reusable | Moderate — ⭐⭐⭐ targeted face/scalp UV protection | Sunny conditions, long outdoor waits | Choose 3"+ brim, light color, and secure strap for rides |
| Small Backpack / Day Bag (15–25L) | Low–Moderate — select size and pack smartly | Moderate — purchase cost; avoid overpacking | High — ⭐⭐⭐⭐ organizes essentials and frees hands | Carrying water, snacks, first aid; family days | Keep 15–25L, distribute weight, use hip belt |
| Portable Phone Mount/Holder | Moderate — setup and adjustment required | Low — typically $10–30; possible extra mounts | Medium — ⭐⭐⭐ enables hands-free capture but adds risk | POV recording, vlogging, hands-free photos (not allowed on some rides) | Secure mount; remove on restricted rides; backup media |
| Portable Snacks (Non-Perishable) | Low — pack and access; respect park rules | Low — inexpensive but uses bag space | High — ⭐⭐⭐⭐ sustains energy and reduces costs | Long days, budget-conscious visitors, between meals | Choose non-perishable, individually wrapped, avoid meltables |
| Motion Sickness Prevention (Ginger/Dramamine/Sea-Bands) | Moderate — requires timing and testing | Low — affordable; med side effects possible | Variable — ⭐⭐–⭐⭐⭐ effectiveness varies by individual | Spinning/looping rides; motion-sensitive riders | Test before park day; take meds 30–60 min prior; stay hydrated |
| Portable Blister / First Aid Kit | Moderate — assemble kit and know how to use | Low–Moderate — affordable and compact | High — ⭐⭐⭐⭐ treats/prevents minor issues quickly | Long walking days, families, those prone to blisters | Address hotspots immediately; keep kit accessible and fresh |
Pack Smart, Play Harder
An unforgettable day at an amusement park is rarely a matter of luck; it’s a direct result of smart, intentional preparation. The difference between a day filled with laughter and a day cut short by discomfort often comes down to what’s in your bag. This comprehensive guide has walked you through the absolute essentials, transforming your packing list from a simple chore into a powerful strategy for maximizing fun and minimizing stress.
By now, you understand that knowing what to bring to an amusement park is about more than just remembering sunscreen. It’s about anticipating the challenges of a long, active day and equipping yourself with practical solutions. From the simple genius of a fully charged power bank that keeps your digital map and camera ready, to the game-changing comfort of well-worn shoes that prevent painful blisters, each item on this list serves a critical purpose.
From Good Day to Great Day: Your Key Takeaways
The most important lesson is that small items yield big returns. Think about the impact of these simple choices:
- Financial Savings: Bringing your own snacks and a reusable water bottle can easily save a family of four over $100 in a single day, freeing up your budget for a special souvenir or a future trip.
- Physical Comfort: A well-stocked first-aid kit, motion sickness remedies, and proper sun protection are your first line of defense against the elements, preventing minor issues from derailing your entire experience.
- Time Maximization: Having everything you need on hand means no time wasted searching for an overpriced bottle of water, a bandage, or a place to charge your phone. That’s more time for rides, shows, and making memories.
Ultimately, the goal is to shift your focus from managing problems to embracing the adventure. When you're not worried about a dead phone battery, a throbbing headache, or a surprise rain shower, you are fully present. You can soak in the sights, savor the thrills, and connect with the people you’re with. Packing thoughtfully is an act of self-care that pays dividends in the form of pure, unadulterated joy. So, use this checklist, pack your bag with confidence, and get ready to conquer the day.
Ready to upgrade your amusement park essentials with gear that’s as smart as your packing list? Explore HYDAWAY's collection of innovative, collapsible water bottles and travel-friendly dinnerware that save space without sacrificing performance. Visit HYDAWAY to discover the perfect space-saving solutions for your next adventure.